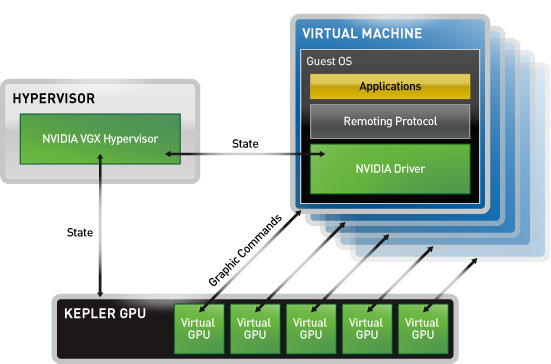
INTRODUCING THE GPU-ACCELERATED CLOUD NVIDIA VGX offloads VDI graphics processing from the CPU to the GPU, allowing the data center manager to deliver true PC graphics-rich experiences to more users for the first time. Benefits of NVIDIA VGX for IT: Leverage industry-leading VDI solutions, including Citrix, Microsoft, and VMware Add your most graphics-intensive users to your VDI solution Improve the productivity of all VDI users Benefits of NVIDIA VGX for users: Highly responsive windows and rich multimedia experiences Access to all critical applications, including the most 3D-intensive Access from anywhere, on any device. VGX HYPERVISOR The key technology to enable hardware virtualization of the GPU is the NVIDIA VGX Hypervisor, which allows a virtual machine to interact directly with a GPU. The VGX Hypervisor manages GPU resources that enable multiple users to share common hardware while improving user density, and creates a true PC experience in the cloud. With the NVIDA VGX Hypervisor, each virtual machine has direct access to the GPU for an optimized cloud experience. USER-SELECTABLE MACHINES (USMS) The VGX Hypervisor enables the use of User-Selectable Machines (USMs) — allowing system administrators to configure and provision the physical VGX hardware to take on the characteristics needed for...
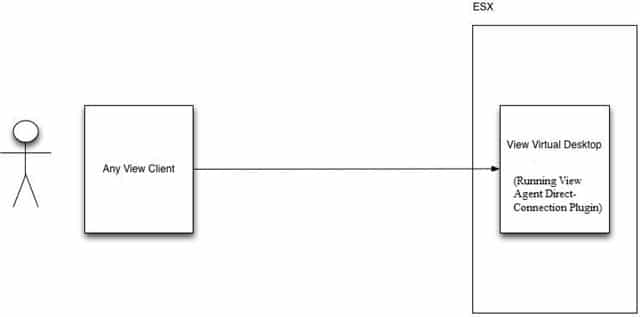
VMware View Agent Direct-Connection Plugin (VADC-Plugin) is a new extension to VMware View environments which is installed on the virtual desktops to support direct connections from any VMware View client without requirement to go through a View Connection Server or View Security Server. View Agent Direct-Connection Plugin is a small DLL that must be dropped into the virtual desktop parent image alongside the VMware View Agent. There is no additional process or services to be installed. The DLL itself is the View Agent Direct-Connection Plugin and when present is loaded automatically when the View Agent is started. View Agent Direct-Connection Plugin communicates with the VMware View Agent using a high performance in-process shared memory channel. There is no JMS messaging used in this process. View Agent Direct-Connection Plugin is all about providing a direct connection method while maintaining all the great capabilities provided by the VMware View and vSphere platforms such as PCoIP, USB redirection, 3D rendering support, SSL Certificates, GPU’s etc… View Agent Direct-Connection Plugin supports all VMware View clients for Windows, Mac, Android, iPad, Teradici Zero Clients and others. How is it configured? Currently View Agent Direct-Connection Plugin supports Windows 7 and Windows 8. There’s very little...
One of the biggest advantages that our customers see when they choose to use VDI as their desktop virtualization technology of choice is simplicity. In their current environment they have mastered the art of creating, deploying and managing a Windows desktop operating system and choosing VDI allows them to reuse all of that knowledge. Blindly deploying entirely the same Windows desktop image that was used for the physical desktops is a little naive though. Running Windows in a VDI environment requires a decent amount of optimizing. This optimizing is nothing new. We have been optimizing SBC environments for over ten years now and many of things that we learned there (the hard way) apply equally to VDI environments. We have created a piece of software that contains our entire ‘optimizing knowledge’ called the Quest vWorkspace Desktop Optimizer and we have decided to make it available to the desktop virtualization community, completely free of charge! Although optimized for Quest vWorkspace environments, the Quest vWorkspace Desktop Optimizer will work just as well in Citrix XenDesktop or VMware View environments. If you can wait to get your hands on it, you can download the Quest vWorkspace Desktop Optimizer here http://bit.ly/VDIopt but please read the rest of this...
VMware View 5.0 exposes Teradici’s PCoIP session statistics through the WMI interface. Before View 5.0 the only mechanism to identify bandwidth usage and allocation was trough the log files. The log files are still a good source and there are few good applications that will consolidate log files and demonstrate the broad PCoIP utilization and network conditions in your organization. Please refer to App for PCoIP Real-Time Monitoring across your Organisation. The PCoIP Session statistics are available virtual desktops running VMware View agent 5.0 and can be retrieved from the host VM utilizing PerfMon. The PCoIP statistics are grouped within the following name spaces: PCoIP Session General Statistics PCoIP Session Network Statistics PCoIP Session Audio Statistics PCoIP Session Imaging Statistics PCoIP Session USB Statistics After a PCoIP session is closed, all the statistics are reset to zero. If the WMI property SessionDurationSeconds is a non-zero value and if it stays the same, it means PCoIP server has been forcefully ended or crashed. If SessionDurationSeconds changes from non-zero to zero value, it means PCoIP session has been closed. The PCoIP Session Statistics are updated every second. WMI Namespace: root\CIMV2 For automation of management task such as querying for management data, execution...
When you examine the landscape of desktop virtualization solutions that are being implemented at organizations, two such solutions immediately stand out: Citrix XenDesktop and VMware View. I have written a lot on XenDesktop and I most certainly love the product, but I also have a secret love affair with VMware View. In this article, I will show you how you can tweak VMware View and its PCoIP remoting protocol for optimal performance and the best possible user experience. Let’s get started: 1. Back to basics: Tweak the User Interface Visual Effects If possible, use the Windows Thin PC version of the OS Set Visual Effect to Best Performance Disable Desktop Wallpaper Disable Screen Saver or set it to None Revert back to the classic Start menu Disable Themes (if possible) Disable additional fading System icon and text changes Disable any unnecessary Windows services — Help and Support, Windows Audio (if you don’t need sound), Wireless, Remote Registry (be careful, though: some applications need this service, so make sure you properly test), Error Reporting — and any other service that is not needed 2. QoS PCoIP If left without any QoS, PCoIP can consume up to 20MB per session, causing significant...
In some cases VMware View may show a problem with the certificate on the vCenter Server, displaying a dashboard red flag even when certificates and properly in place. This behavior can happen because the administrator entered the vCenter Server address in VMware View Admin UI using the short name instead of the FQDN, but the certificate used on the vCenter Server is a wildcard certificate for the domain. It’s not possible to modify the vCenter Server URL/Name via Admin UI without removing and re-adding the vCenter instance into VMware View. The problem in doing this operation is that desktop pool configurations will be lost and no new desktops is provisioned or deleted untill desktop pools are re-configured. However, there is an easier way to modify the vCenter URL, via the ADAM database. You will need to launch ADSI (adsiedit.msc) in one of the View Connection Servers and modify the attribute pae-VCURL in CN=<VCGUID>,OU=VirtualCenter,OU=Properties,DC=vdi,dc=vmware,dc=int. This attribute is where the vCenter URL entry is stored. That should be all that’s needed, the View broker will pick up the changes and reconnect to vCenter Server without requiring additional steps. Reference: http://myvirtualcloud.net/?p=4075
As you may know, View Agent offers an administration solution based on group policy for PCoIP session, View Client configurations and other configurations that they are related to VMware View Connection server and virtual desktops session. These configuration templates are available as ADM file on View server’s local path and available for download from VMware site. Especially, PCoIP session settings can help you to reduce your bandwidth usage, even block virtual machine’s USB devices such as mass storage devices and optimize your sound quality. About PCoIP session configurations, I had to configure settings locally on a test virtual machine, export them form registry and apply on my templates. I found an utility that it can change you session settings, store them as profile and also monitor your session health via WMI counters. You can download it from this link and find more information about that.
When you unassign a VM from a user in VMware View pool, the user name not be deleted from “Pool Entitlement”, If you checked “Enable Auto Assignment” in you pool settings and the user send a request to the pool, View will assign a new VM (Mostly spare VM) to the user, this is a misconfiguration. You can delete users which don’t have VM on the pool for the pool entitlement by this script: # By Davoud Teimouri v0.1 CLS #Clear screen Write-Host(“This script will clean your pool from unassigned users”) $PoolID=Read-Host (“Please enter PoolID”) #Get PoolID from the user (Sometimes PoolID is same as pool name $Users=Get-PoolEntitlement -pool_id $PoolID | Select-Object displayname #Query pool’s users and store them to $Users Foreach ($User in $USers) { $User=$User.displayname $RUser=$User.Substring(15) #Change this based on your domain name Write-Host (“Proccessing on: ” + $RUser) -foregroundcolor “Green” Write-Host $VM=Get-DesktopVM -pool_id $PoolID | Select-Object user_displayname | Where-Object {$_.user_displayname -eq $User} If ($VM -eq $Null) { Get-User -name $RUser | Where-Object {$_.displayname -eq $user} |Remove-PoolEntitlement -pool_id $PoolID | Out-Null Write-Host ($User + ” has been removed from ” + $PoolID) -foregroundcolor “Red” Write-Host } } This script should run on View server directly. [quotes_and_tips]
The VMware View Client delivers useful information to the VMware View Agent which can be found in the virtual desktops Windows registry. This information can be used by scripts i.e. for mapping the right network printer based on the location of the View Client device. The information is stored as environment variables within the registry key: HKEY_CURRENT_USER\Volatile Environment. This list shows which variables are available: ViewClient_Broker_DNS_Name (FDQN of the broker) ViewClient_Broker_Remote_IP_Address ViewClient_Broker_Tunnel_URL ViewClient_Broker_Tunneled (True/False) ViewClient_Broker_URL ViewClient_IP_Address (IP address of the connecting device) ViewClient_LoggedOn_Domainname (Domainname) ViewClient_LoggedOn_Username (Username) ViewClient_MAC_Address (Client MAC address) ViewClient_Machine_Name (Client hostname) ViewClient_Type (Linux/Windows) You can read this information very easily from the registry using a VB-script: Example: Based on the client’s hostname, IP-address or MAC address it would be possible to map a special printer or network drive during logon or reconnect. Companies using hot desks for their employees or just people moving between different workplaces during the day can take advance of that. The script can grab the client name variable, then check it against a database and retrieve the correct network printer for that location. That’s it! Reference: http://www.thatsmyview.net/2009/05/29/using-client-information-in-vmware-view/ [quotes_and_tips]
Displays the Resultant Set of Policy (RSoP) information for a remote user and computer. For examples of how this command can be used. Syntax gpresult [/s <COMPUTER> [/u <USERNAME> [/p [<PASSWORD>]]]] [/user [<TARGETDOMAIN>\]<TARGETUSER>] [/scope {user | computer}] {/r | /v | /z | [/x | /h] <FILENAME> [/f] | /?} Parameters Note Except when you use /?, you must include an output option, either /r, /v, /z, /x, or /h. Parameter Description /s <COMPUTER> Specifies the name or IP address of a remote computer. Do not use backslashes. The default is the local computer. /u <USERNAME> Uses the credentials of the specified user to run the command. The default user is the user who is logged on to the computer that issues the command. /p [<PASSWORD>] Specifies the password of the user account that is provided in the /u parameter. If /p is omitted, gpresult prompts for the password. /pcannot be used with /x or /h. /user [<TARGETDOMAIN>\]<TARGETUSER> Specifies the remote user whose RSoP data is to be displayed. /scope {user | computer} Displays RSoP data for either the user or the computer. If /scope is omitted, gpresult displays RSoP data for both the user and the computer. [/x | /h] <FILENAME> Saves the report in either XML (/x) or HTML (/h) format at the location and with...
I’m working on our USB sound problem in Call Center with virtual machines and PCoIP and found this article that explains DPC and processes latency in Windows 7 and also 8. Of curse we found a solution that using 3.5 mm jack headset and Teradici audio driver. Sound quality is very good on this solution and Teradici driver can deliver HD sound via PCoIP to users. I tested many solution about this problem such as PCoIP tuning, virtual machine optimization and also VMware documents about Best Practices for Performance Tuning of Latency-Sensitive Workloads in vSphere VMs but nothing changed in my tests. I hope this problem will resolve on newer version of vSphere or VMware View. INTRODUCTION The list of brands for Windows computers, as well as the possible combination of hardware used in PCs is practically unlimited – this can lead to compatibility issues or undesired interaction of components. Also, many PC computers and their components are designed to deliver good performance for office applications or gaming. The demands placed on a computer used for music production are usually quite different than those for office or gaming computers. As a result, it is often necessary to tune off-the-shelf or self-built computer...
When we installed a new hardware or upgraded a driver, driver packages will be added to “%SystemRoot%System32\DriverStore”, After few time Driver Store folder size will grow and maybe it’s increased to above 2 GB or more, for cleaning and removing unneeded drivers, you can download “DriverStore Explorer” from this address: http://driverstoreexplorer.codeplex.com/ [quotes_and_tips]
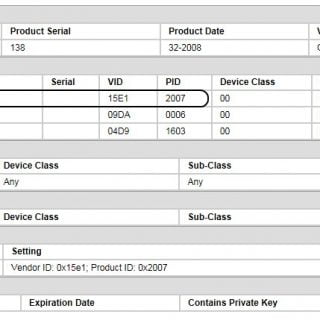
A smart card, chip card, or integrated circuit card (ICC), is any pocket-sized card with embedded integrated circuits. A smart card ormicroprocessor cards contain volatile memory and microprocessor components. The card is made of plastic, generally polyvinyl chloride, but sometimes acrylonitrile butadiene styrene or polycarbonate. Smart cards may also provide strong security authentication for single sign-on (SSO) within large organizations. Smart cards supported by PCoIP but we need to configure somethings on virtual machines and PCoIP management console and then you can use it same as a USB drive. Also this feature supported by VMware, I’ve tested that on vSphere 5 platform. You must access to PCoIP MC, zero clients web access page and modify installed VMware view agent features. If you need to use smart card within virtual machine, you should remove PCoIP smart card feature from View Agent. After install VMware View Agent on your virtual machine, plug your security device to zero client and then logon on to MC. Select your device in discovery devices list and open view details page. If your security device detected by zero client, you can find that on “USB Devices”. You need to VID and PID values for insert to a new profile. Close view details page and go to “Profile” tab, you must create a new...
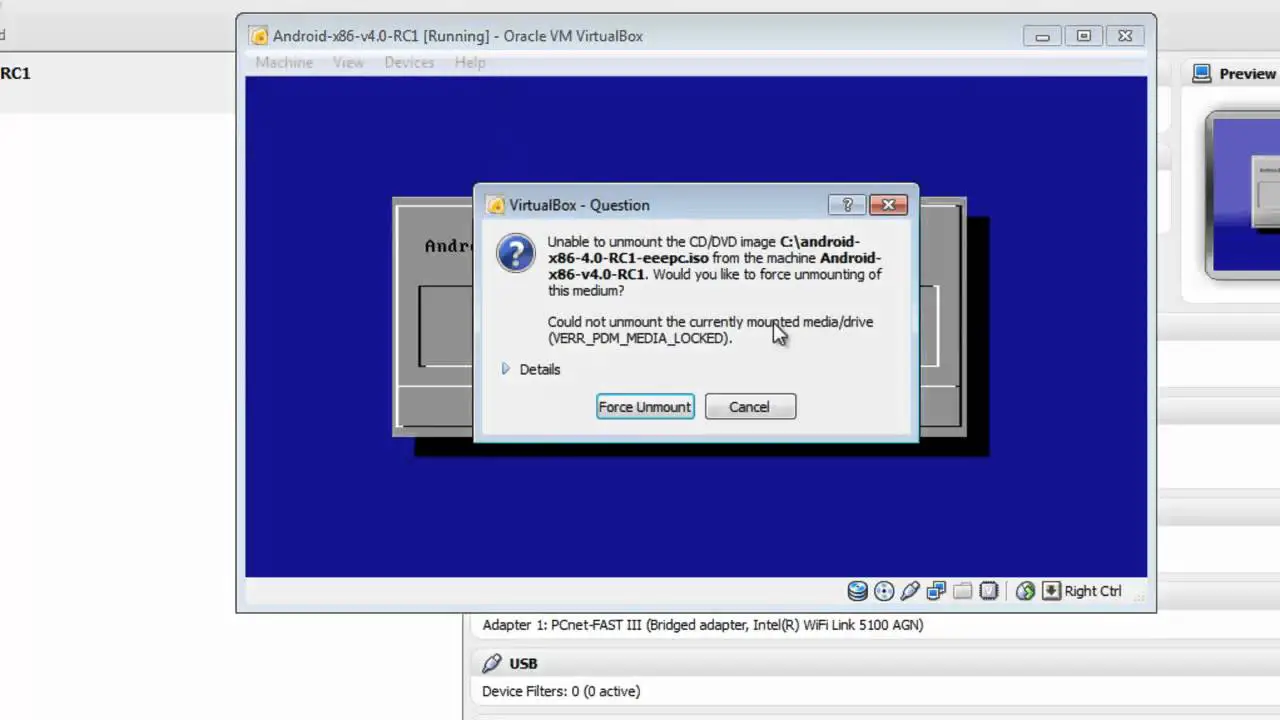
Android-x86 is a Linux-based operating system for mobile devices such as smartphones and tablet computers. It is developed by the Open Handset Alliance led by Google. Android supports ARM,MIPS and x86 platforms. Because Android has been developed on x86 platform, we can install it on some virtualization software as a virtual machine such as VMware Workstation, Oracle VirtualBox, QEMU and etc. In this post we will install Android x86 v4.0 RC1 (Latest version) on Oracle VirtualBox, we need to a source so please download it from this link: http://code.google.com/p/android-x86/downloads/list Please download android-x86-4.0-RC1-eeepc.iso, because we can have network connectivity just on this. After download completed, run your VirtualBox and if you don’t have it, you can download it form this link: https://www.virtualbox.org/wiki/Downloads Android-x86 Installation Steps 1. Click on New in VirtualBox for create a new virtual machine. 2. Enter your VM name and select OS type, you must select “Linux” for operating system and “Other Linux” for version. 3. Android need to 256 MB memory but 512 MB is recommended. 4. We need a medium for saving Android files on that, so like other virtual machines, we add a hard disk to it. 5. Select VHD hard disk type, I will explain about...
As we saw on the previous post, we need to install ESXi 5 on both types of lab (Virtual or Physical) so we need to installation source. You must create an account on www.vmware.com and then you can download it. After download iso file, burn it on a CD. Before we start installation, we must check which do we have minimum hardware or our hardware are compatible with ESXi 5 or not? Minimum system requirement: 64bit processor with minimum two cores ( Supports only LAHF and SAHF CPU instructions) 2GB RAM 900 MB free space on storage device (local storage or remote storage) Enable Intel-VT or AMD-V in BIOS, if you want to install ESXi on a virtual machine, for VMware Workstation 7.x you must select Linux (2.6) 64-bit for OS type or ESXi 4, ESXi 5 is defined in VMware Workstation 8.x. Oracle Virtual Box 4.x is same as Workstation 7.x . Boot your machine by ESXi 5 disk, you will see boot menu, for start installation press Enter. ESXi installer beings to load modules on RAM. In next step welcome screen will shown. For accept license agreement press F11 and continue installation process. Installer search your available...